深入 Decodable —— 写一个超越原生的 JSON 解析器
这篇文章发表出来的三年之后,开源版的 Foundation 使用同样的思路重写了 JSONDecoder 的 Parser 部分,感兴趣的朋友可以点击进去查看,比起本文实现的版本更加可靠,测试也更加完备。
如果只是想要了解 JSONDecoder 和 Parser,这篇文章还是可以帮到你。
Codable 出来很久了,不过好像还没有比较详细讲过如何自定义 Decoder 的文章,在这里就打算写一篇来介绍。
本文将带着大家深入了解一下 Decoder 的抽象,但单纯讲抽象看代码会有点太无聊,所以文章会有两部分,第一部分讲 Decoder 的抽象,第二部分,我们使用比较简单的抽象来自定义一个 JSONDecoder,并且针对原生的不足,做一些针对性的优化,让我们自定义的这个 Decoder 拥有更强的性能和拓展性。
Decoder 协议
我们先来简单了解一下原生的 JSONDecoder,实际上 JSONDecoder 并不遵循 Decoder 的协议,它只保存了 DecodingStrategy,例如日期,浮点数格式的处理。
实际遵循 Decoder 的是 _JSONDecoder 这一个私有类,并且只会在每次调用 decode 的方法时,才会生成一个 _JSONDecoder 的实例去完成解析:open func decode<T : Decodable>(_ type: T.Type, from data: Data) throws -> T {
let topLevel: Any
do {
topLevel = try JSONSerialization.jsonObject(with: data)
} catch {
throw DecodingError.dataCorrupted(DecodingError.Context(codingPath: [], debugDescription: "The given data was not valid JSON.", underlyingError: error))
}
let decoder = _JSONDecoder(referencing: topLevel, options: self.options)
guard let value = try decoder.unbox(topLevel, as: type) else {
throw DecodingError.valueNotFound(type, DecodingError.Context( codingPath: [], debugDescription: "The given data did not contain a top-level value."))
}
return value
}
Decoder 本质上是一个状态机,记录当前 decode 的状态,和已经 decode 的内容,这是它的声明:public protocol Decoder {
// 当前的解析路径,例如 articleList > [3] > articleId
public var codingPath: [CodingKey] { get }
// 上下文信息,例如解析 JSON 的时候,可以带上请求的接口,Model 的类型等等
// 自定义 Decoder 的时候我们可以通过这个属性来实现更加友好的错误信息
public var userInfo: [CodingUserInfoKey : Any] { get }
// 三种数据容器,后面会做更详细的介绍
public func container<Key>(keyedBy type: Key.Type) throws -> KeyedDecodingContainer<Key> where Key : CodingKey
public func unkeyedContainer() throws -> UnkeyedDecodingContainer
public func singleValueContainer() throws -> SingleValueDecodingContainer
}
DecodingContainer
DecodingContainer 简单来说是实际数据结构的一层抽象封装,提供了统一的接口让我们可以获取数据,任何数据套上这层封装都可以被我们使用下面这几种方式去获取值:
- 键值对:也就是 Key-Value 结构,对应的 Container 是
KeyedDecodingContainer - 序列:也就是我们常规理解的数组,对应的 Container 是
UnkeyedDecodingContainer(虽然这个 container 也可以归并为Int作为 key 的KeyedDecodingContainer) - 单一值:,用来表示一个单一的值,例如
Double/String之类的,对应的 container 是SingleValueDecodingContainer
DecodingContainer 里有三种类型的内容:
- Decoding 的上下文
decode方法decodeIfPresent方法- 与其它 container 的转换
- superDecoder
上下文信息
- KeyedDecodingContainer
codingPath: [CodingKey]:当前的解析路径allKeys: [Self.Key]:所有 keycontains(_ key: Self.Key) -> Bool:是否包含了某个 key
- UnkeyedDecodingContainer
codingPath: [CodingKey]count: Int:数量currentIndex: Int:当前解析的索引isAtEnd: Bool:是否已经解析到尾部
- SingleValueDecodingContainer
codingPath: [CodingKey]
值得注意的是,codingPath 统一用了 CodingKey 这个泛型,因为 codingPath 里可能会包含很多不同的类型。
decode 方法
以 KeyedDecodingContainer 为例,我们来看一下所有 decode 方法的声明:public protocol KeyedDecodingContainerProtocol {
...
// 泛型 T
public func decode<T>(_ type: T.Type, forKey key: Self.Key) throws -> T where T: Decodable
// Bool
public func decode(_ type: Bool.Type, forKey key: Self.Key) throws -> Bool
// String
public func decode(_ type: String.Type, forKey key: Self.Key) throws -> String
// Int
public func decode(_ type: Int.Type, forKey key: Self.Key) throws -> Int
public func decode(_ type: Int8.Type, forKey key: Self.Key) throws -> Int8
public func decode(_ type: Int16.Type, forKey key: Self.Key) throws -> Int16
public func decode(_ type: Int32.Type, forKey key: Self.Key) throws -> Int32
public func decode(_ type: Int64.Type, forKey key: Self.Key) throws -> Int64
// UInt
public func decode(_ type: UInt.Type, forKey key: Self.Key) throws -> UInt
public func decode(_ type: UInt8.Type, forKey key: Self.Key) throws -> UInt8
public func decode(_ type: UInt16.Type, forKey key: Self.Key) throws -> UInt16
public func decode(_ type: UInt32.Type, forKey key: Self.Key) throws -> UInt32
public func decode(_ type: UInt64.Type, forKey key: Self.Key) throws -> UInt64
// Float
public func decode(_ type: Float.Type, forKey key: Self.Key) throws -> Float
public func decode(_ type: Double.Type, forKey key: Self.Key) throws -> Double
// Null
func decodeNil(forKey: Self.Key) -> Bool
...
}
第一眼看上去你可能会觉得有点疑惑,除了最后一个方法之外都可以归并到 decode<T> 这个泛型方法上,但是为什么要有一个具体类型的重载?平时我们写代码的时候,init(from:) 方法大概是这个样子的:struct Foo: Codable {
let bar: Bool
init(from decoder: Decoder) throws {
let container = try decoder.nestedKeyedContainer(keyedBy: CodingKeys.self)
bar = try container.decode(Bool.self, forKey: .bar)
}
}
那么 Bool 类型的 init(from:) 方法会是怎么样的?答案是这样子的:extension Bool : Codable {
public init(from decoder: Decoder) throws {
self = try decoder.singleValueContainer().decode(Bool.self)
}
}
最前面介绍 container 的时候,就说过,container 是对于实际数据的一层封装,换句话说它需要负责与实际数据进行交互,而 Swift 标准库对于实际交互方式是一无所知的,所以 container 必定需要提供这些基础类型的 decode 方法,才能让 Bool 这些基础类型能够遵循 Codable 协议。
个人觉得如果能把
Int跟UInt都用FixedWidthInteger这个泛型来概括会更好,溢出时的处理就再增加一个 DecodingStrategy。
decodeIfPresent 方法
decodeIfPresent 的含义就是如果存在就 decode,对于 KeyedDecodingContainer 来说就是存在对应的 key 并且值不为 null,而对于 UnkeyedDecodingContainer 来说就是序列还存在有未解析的值。
decodeIfPresent 方法跟 decode 方法基本上一一对应,除了 decodeNil。
decodeIfPresent 有默认的实现,并且会调用对应的 decode 方法:public func decodeIfPresent<T : Decodable>(
_ type: T.Type, forK ey key: Key) throws -> T?
{
guard try self.contains(key) && !self.decodeNil(forKey: key)
else { return nil }
return try self.decode(T.self, forKey: key)
}
Container 的切换
数据在解析时,我们可能需要使用不同的 Container 或者 CodingKey 去用存取数据,KeyedDecodingContainer 跟 UnkeyedDecodingContainer 都提供了切换 Container 和 CodingKey 的接口:// KeyedDecodingContainer
func nestedContainer<NestedKey>(keyedBy type: NestedKey.Type, forKey key: Key) throws -> KeyedDecodingContainer<NestedKey>
func nestedUnkeyedContainer(forKey key: Key) throws -> UnkeyedDecodingContainer
// UnkeyedDecodingContainer
mutating func nestedContainer<NestedKey>(keyedBy type: NestedKey.Type) throws -> KeyedDecodingContainer<NestedKey>
mutating func nestedUnkeyedContainer() throws -> UnkeyedDecodingContainer
superDecoder
superDecoder 主要是用来描述继承关系,这样的设计主要是为了支持继承,让继承关系也能编码起来,而且也在每一层都把父类的信息都可以封装得很好,只要 container 调用方法 superDecoder 就能获得父类所需的 decoder,传入 super.init(from:) 里就可以完成操作了。// KeyedDecodingContainer
func superDecoder() throws -> Decoder
func superDecoder(forKey key: Key) throws -> Decoder
// UnkeyedDecodingContainer
mutating func superDecoder() throws -> Decoder
自定义 JSONDecoder
这里我们自定义的 JSONDecoder 使用尽量少的抽象去完成,这是下面要讲的内容:
- AST 后端
- Container 的编写
- AST 对象的获取
- AST 对象 -> 目标类型
- Container 的转换
- superDecoder
- JSONDecoder 的实现
- Container 的生成
- 错误处理
- 拓展 JSONDecoder
- 性能测试
具体的实现我已经放到 GitHub 上了,大家可以对照着往下看。
AST 解析后端
JSONDecoder 通常需要把字符串先转化为 AST,然后再转化为相应的模型。原生的 JSONDecoder 目前还是使用着 Obective-C 时代的 NSJSONSerialization 来做 AST 的解析,虽然效率很高,但是 [String: Any] 作为一种 AST 类型效率太低,在解析过程中需要进行大量的类型转换,这些类型转换操作都会在运行时完成,导致效率低下,并且转换出来的类型低层实现都是 Swift 与 Objective-C 的兼容类型,效率不如 Swift 的原生类型。
只要换一个 AST 解析后端,并且使用一种更加高效的 AST 类型,就可以获得数倍的性能提升。本文里我们就直接使用 vdka/JSON 这个库来作为 AST 解析后端,它使用了枚举来作为 AST 的类型,性能更好,而且类型更加明确:public enum JSON {
case object([String: JSON])
case array([JSON])
case null
case bool(Bool)
case string(String)
case integer(Int64)
case double(Double)
}
Container 的编写
首先需要KeyedDecodingContainerProtocol 因为声明里有 associatedType,所以需要用 KeyedDecodingContainer 这个结构体来进行类型抹除(type erase)。
Container 里都会存放一个 JSON 对象去让它们获取数据,Container 里的 decode 的过程都是:
- 获取 AST 对象
- 把 AST 对象转化为原生类型
KeyedDecodingContainer, UnkeyedDecodingContainer 和 SingleValueDecodingContainer 只是会在第一步有所不同,第二步都是一样的,所以我们可以把第二步抽象出来放到 JSONDecoder 里。
AST 对象获取
首先我们来定义各个 container 的获取 AST 对象的操作,KeyedDecodingContainer 通过 key 获取 AST 对象:func object(forKey key: Key) throws -> JSON {
guard let object = rootJSONObject[key.stringValue] else {
throw DecodingError.keyNotFound(key, DecodingError.Context( codingPath: decoder.codingPath, debugDescription: "No value associated with key \(key) (\"\(key.stringValue)\")."))
}
return object
}
UnkeyedDecodingContaienr 因为是序列结构,所以直接迭代获取即可:mutating func nextObject() throws -> JSON {
guard !isAtEnd else {
throw DecodingError.valueNotFound(JSONObject.self, DecodingError.Context(codingPath: decoder.codingPath + [currentKey], debugDescription: "Unkeyed container is at end."))
}
defer { currentIndex += 1 }
return rootJSONObject[currentIndex]
}
SingleValueDecodingContainer 因为只存放一个值而已,所以直接返回自己持有的数据即可:func object() throws -> JSON {
return self.rootJSONObject
}
AST 对象 -> 原生类型
这一部分函数我们放到 JSONDecoder 里去完成,把这些函数统一命名为 unbox,得益于 Swift 的泛型设计,整数跟浮点数的部分我们只需要有两个函数即可:// 浮点数
func unbox<T>(_ object: JSONObject) throws -> T where T: BinaryFloatingPoint, T: LosslessStringConvertible {
guard case let .double(number) = object else {
throw DecodingError._typeMismatch(expectation: T.self, reality: object)
}
switch T.self {
case is Double.Type:
guard let double = Double(exactly: number) else {
throw DecodingError._numberMisfit(expectation: T.self, reality: number)
}
return double as! T
case is Float.Type:
guard let float = Float(exactly: number) else {
throw DecodingError._numberMisfit(expectation: T.self, reality: number)
}
return float as! T
default:
fatalError()
}
}
// 整数
func unbox<T>(_ object: JSONObject) throws -> T where T: FixedWidthInteger {
guard case let .integer(number) = object else {
throw DecodingError._typeMismatch(expectation: T.self, reality: object)
}
guard let integer = T(exactly: number) else {
throw DecodingError._numberMisfit(expectation: T.self, reality: number)
}
return integer
}
接着是 Bool / String / T: Codable / Nil:func unbox(_ object: JSONObject) throws -> Bool {
guard case let .bool(bool) = object else {
throw DecodingError._typeMismatch(expectation: Bool.self, reality: object)
}
return bool
}
func unbox(_ object: JSONObject) throws -> String {
guard case let .string(str) = object else {
throw DecodingError._typeMismatch(expectation: String.self, reality: object)
}
return str
}
func unboxDecodable<T>(_ object: JSONObject) throws -> T where T: Decodable {
currentContainer = object
return try T.init(from: self)
}
func unboxNil(_ object: JSONObject) -> Bool {
return object == .null
}
在 unboxDecodable 方法里,实际上我们会直接调用 T 的 init(from:) 方法,这里还需要记录一下当前的解析进度,后面讲到 container 生成的方法时会再讲到。
上面写的只是 AST 对象到原声类型的转化过程,实际上 KeyedDecodingContainer 和 UnkeyedDecodingContainer 还得在 unbox 之前,把当前的 key push 到 codingPath 里,然后在 unbox 之后,再 pop 出来:func unbox<T>(_ object: JSONObject, forKey key: CodingKey) throws -> T where T: BinaryFloatingPoint, T: LosslessStringConvertible {
codingPath.append(key)
defer { codingPath.removeLast() }
return try unbox(object)
}
...
接着每个 container 就只要调用 decoder 的 unbox 方法去实现各自的 decode 方法,大家可以直接看示例项目。
Container 的切换
Container 的转换只有 KeyedDecodingContainer 和 UnkeyedDecodingContainer 两种的互转,并且 Decoder 本身也需要生成 container,所以把这部分逻辑也放到 decoder 里去完成:func container<Key>(keyedBy type: Key.Type, wrapping object: JSON) throws -> KeyedDecodingContainer<Key> where Key : CodingKey {
guard case let .object(unwrappedObject) = object else {
throw _typeMismatch(expectation: [String: JSON].self, reality: object)
}
let keyedContainer = _KeyedContainer<Key>(referencing: self, wrapping: unwrappedObject)
return KeyedDecodingContainer(keyedContainer)
}
func unkeyedContainer(wrapping object: JSON) throws -> UnkeyedDecodingContainer {
guard case let .array(array) = object else {
throw _typeMismatch(expectation: [String: JSON].self, reality: object)
}
return _UnkeyedContainer(referencing: self, wrapping: array)
}
superDecoder
首先 CodingKey 这种泛型是没有办法形容 super 这个 key 的,所以我们会需要一种 CodingKey 去形容 super,这里直接借鉴原生 Decoder 的做法创建一个 JSONKey 类型:struct JSONKey : CodingKey {
var stringValue: String
var intValue: Int?
init?(stringValue: String) {
self.stringValue = stringValue
self.intValue = nil
}
init?(intValue: Int) {
self.stringValue = "\(intValue)"
self.intValue = intValue
}
init(index: Int) {
self.stringValue = "Index \(index)"
self.intValue = index
}
static let `super` = JSONKey(stringValue: "super")!
}
实际上我们在 UnkeyedDecodingContainer 里生成 key 的时候也需要用到这个类型。
这里需要提到原生 JSONDecoder 的一个 “Bug”,以 KeyedDecodingContainer 为例,原生的 superDecoder 实现是这样子的:private func _superDecoder(forKey key: CodingKey) throws -> Decoder {
self.decoder.codingPath.append(key)
defer { self.decoder.codingPath.removeLast() }
let value: Any = self.container[key.stringValue] ?? NSNull()
return _JSONDecoder(referencing: value, at: self.decoder.codingPath, options: self.decoder.options)
}
public func superDecoder() throws -> Decoder {
return try _superDecoder(forKey: _JSONKey.super)
}
也就是说调用 superDecoder 的时候,会在 object 里通过 super 这个字段去找对应的值,而大家更多的情况可能会是这样子的:class SQLItem: Codable {
var id: Int
var createTimestamp: Double
}
class Comment: SQLItem {
var content: String
...
required init(from: Decoder) throws {
let container = decoder.container(keyedBy: CodingKeys.self)
content = container.decode(String.self, forKey: .content)
try super.init(from: decoder.superDecoder())
}
}
let json = """
{
"id": 1,
"createTimestamp": 23428349,
"content": "WTF"
}
""".data(using: utf8)
// 解析错误
let comment = try! JSONDecoder().decoder(Comment.self, from: json)
原生的 JSONDecoder 在处理这种情况的时候就会出现解析错误,我个人觉得实际上 JSON 这种格式并没有类的继承关系,不太应该使用这种方式去处理。
回到正题,superDecoder 的实现很简单,注意好刚说的问题,直接生成一个新的 Decoder 即可:// UnkeyedDecodingContainer
mutating func superDecoder() throws -> Decoder {
return _JSONDecoder(referencing: JSON.array(sequence), at: decoder.codingPath)
}
// KeyedDecodingContainer
func superDecoder() throws -> Decoder {
return try _superDecoder(forKey: JSONKey.super)
}
func superDecoder(forKey key: K) throws -> Decoder {
return try _superDecoder(forKey: key)
}
private func _superDecoder(forKey key: CodingKey) throws -> Decoder {
codingPath.append(key)
defer { codingPath.removeLast() }
let value = (key is JSONKey) == true
? JSON.object(rootObject)
: rootObject[key.stringValue, default: .null]
return _JSONDecoder(referencing: value, at: decoder.codingPath)
}
JSONDecoder 的实现
Container 的生成
KeyedDecodingContainer 和 UnkeyedDecodingContainer 调用之前 container 互相转换的接口即可:func container<Key>(keyedBy type: Key.Type) throws -> KeyedDecodingContainer<Key> where Key : CodingKey {
return try container(keyedBy: type, wrapping: currentObject)
}
func unkeyedContainer() throws -> UnkeyedDecodingContainer {
return try unkeyedContainer(wrapping: currentObject)
}
func singleValueContainer() throws -> SingleValueDecodingContainer {
return _SingleValueDecodingContainer(referencing: self, wrapping: currentObject)
}
错误处理
前面我们在 unbox 方法里使用了一些错误生成的方法:func _typeMismatch(expectation: Any.Type, reality: JSON) -> DecodingError {
let context = DecodingError.Context(
codingPath: codingPath,
debugDescription: "Expected to decode \(expectation) but found \(reality)) instead."
)
return DecodingError.typeMismatch(expectation, context)
}
func _numberMisfit(expectation: Any.Type, reality: CustomStringConvertible) -> DecodingError {
let context = DecodingError.Context(
codingPath: codingPath,
debugDescription: "Parsed JSON number <\(reality)> does not fit in \(expectation)."
)
return DecodingError.dataCorrupted(context)
}
JSONDecoder 的拓展
既然我们自定义了 JSONDecoder,那么就意味着我们可以有很大的自由去处理 decode 的过程,例如说在 json 里使用 0 跟 1 去表示 Bool,或者是字符串:func unbox(_ object: JSON) throws -> Bool {
func throwError() throws -> Never {
throw _typeMismatch(
expectation: Bool.self,
reality: object
)
}
switch object {
case let .bool(bool):
return bool
case let .integer(integer):
switch integer {
case 0 : return true
case 1 : return false
default : try throwError()
}
case let .string(string):
guard let bool = Bool(string) else { try throwError() }
return bool
case .array, .double, .object, .null:
try throwError()
}
}
或者是我们修改一下 decodeIfPresent 的语义,让 decode 方法如果抛出错误时,直接解析为 null,而不是中断整个解析:// 避免空字符串导致 URL 解析失败,中断了整个解析的问题
func decodeIfPresent<T: Decodable>(_ type: T.Type, forKey key: K) throws -> T? {
guard let object = try? decode(type, forKey: key) else { return nil }
return object
}
其它的就可以靠大家自己发挥想象力了。
性能测试
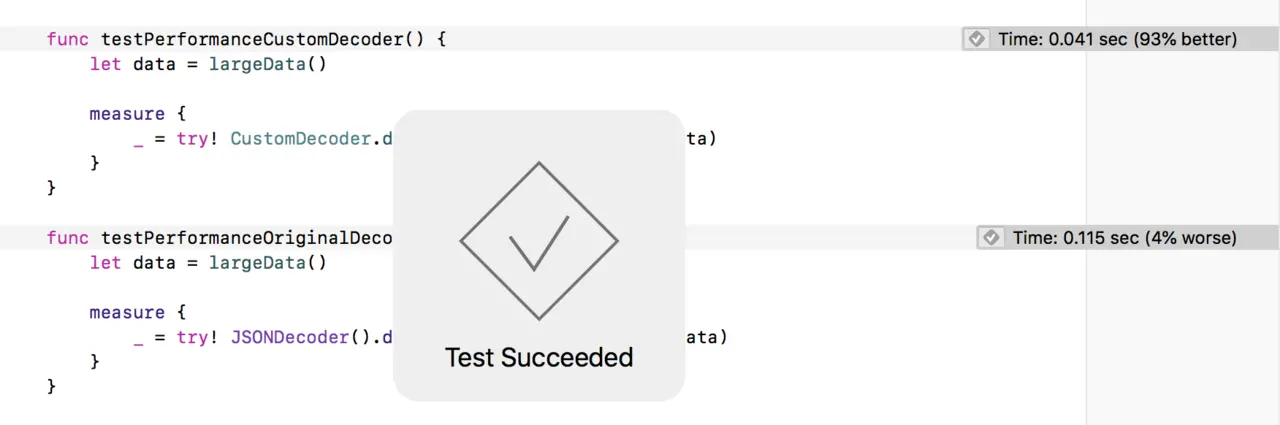
性能测试我简单地使用一个 400 多 k 的 JSON 进行测试,基本上我们自定义的 Decoder 会比原生的高出一倍多。
结语
第一小节我们深入讲解了 Decoder 和三种 DecodingContainer 的定义和原生的部分实现。
第二小节我们自定义了一个 JSONDecoder,替换了 AST 解析后端,获得了巨大的性能提升,然后调整了 superDecoder 的语义,让它在解析 JSON 时更加符合直觉。
希望大家看完这篇文章之后能够对于 Swift 的 Codable 有更加深入的了解。